Chủ Nhật, 19 tháng 10, 2014

How to Delete an iCloud Account from an iPhone / iPad

iCloud For those of us who juggle between multiple iCloud accounts (which is really not recommended), you may need to remove an iCloud account associated with an iPhone or iPad some times. This is typically for situations where you need to swap in a different account, create a new iCloud login for some reason, or just change to another existent iCloud account that is better suited for a device. While iOS makes this process easy, but be sure you know why you would want to do this, otherwise you may encounter unanticipated problems.


Again, this is not recommended unless you know exactly why you’re deleting the iCloud account from your device. A single user with multiple iCloud and Apple ID’s is rarely a good idea. Doing this without reason can cause a variety of complications and errors, ranging from improper or missing iMessage delivery, loss of data syncing, inability to retrieve apps that are associated with an Apple ID and App Store account, the removal of expected iCloud backups, and even loss of files and iCloud data. In short, do not change your iCloud ID or remove your iCloud account from an iPhone, iPad, or iPod touch, unless you know exactly why you’re doing it and you understand the potential complications.

It’s a good idea to back up your iPhone / iPad before doing this just in case you mess something up.

Removing the Existing iCloud Account from iOS

First you’ll need to remove the existing iCloud account that is in use on the iOS device:

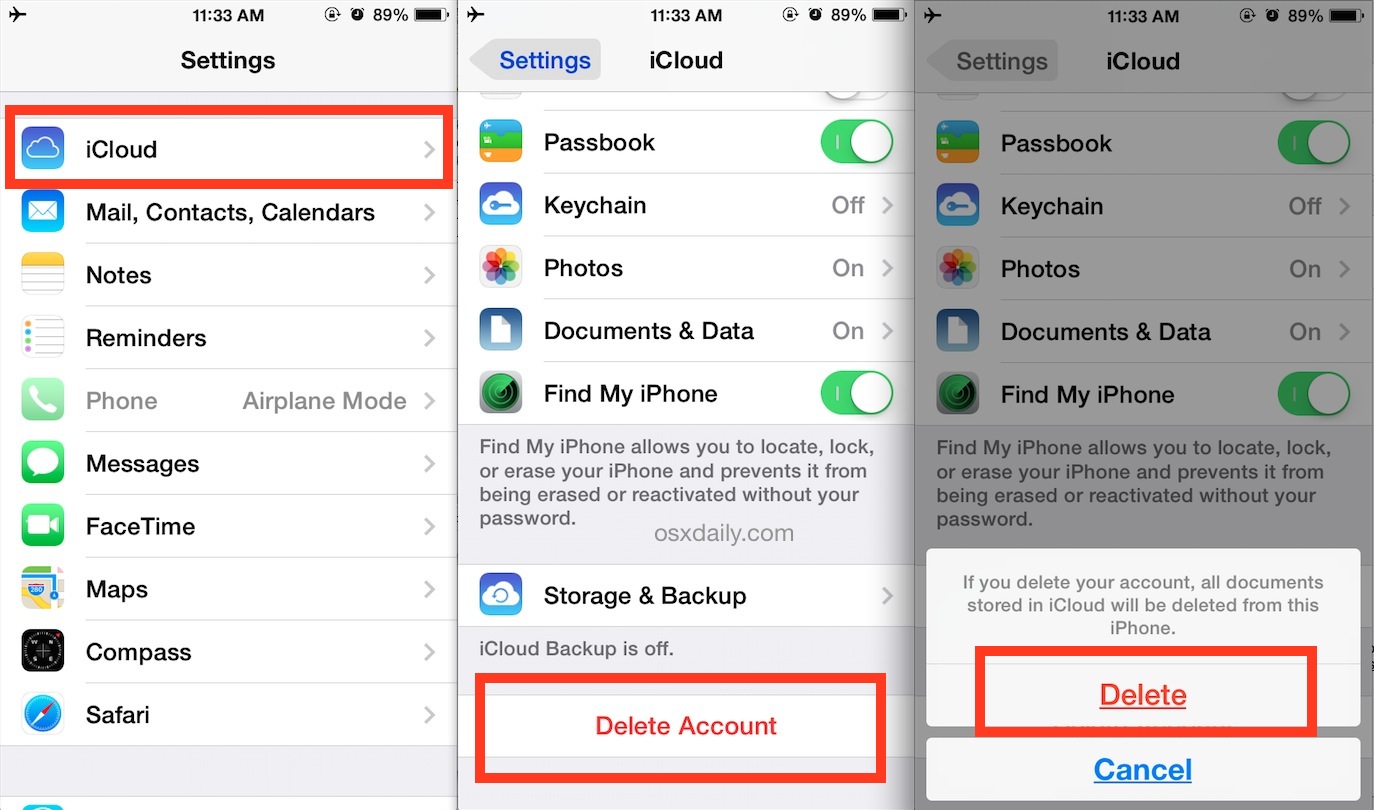
  1. Open the Settings app and go to “iCloud”
  2. Scroll down under all the settings to find “Delete Account” and tap on that
  3. Confirm the removal of the iCloud account from the device by tapping on “Delete”

Delete an iCloud Account from iOS

Note this removes all documents that are from iCloud from the phone or iPad, but not from iCloud itself. Whether or not you want to save contacts and calendar data is up to you.

Once the iCloud account has been removed from the device, you’re left with a blank iCloud login. Here you can either create a new Apple ID and accompanying iCloud account, or change to another iCloud account.

Switching to a Different iCloud Account in iOS

This effectively lets you change between iCloud accounts on any iOS device. Again, this is not a recommended procedure without knowing why you want to do this, since it can lead to a variety of problems. Note if you already changed an Apple Store ID to the proper ID, this is unnecessary as the setting will carry over.

  1. Follow the above steps to remove the existing iCloud account from the iOS device
  2. Enter the new / different iCloud Account credentials and log in as usual by tapping “Sign In”
  3. Choose the iCloud settings to use with the new account ID

Change an iCloud account in iOS

That’s it, the iCloud account associated with the iOS device has been switched.

Both of these tricks is helpful for when you erroneously use a single iCloud account for situations where different ones would be better, for example, using a single iCloud ID on spouses or kids unique iPhones – those are best served with individual iCloud accounts for each device. For your own personal devices, always try to use a single iCloud account and Apple ID, this insures continuity of app and iTunes purchases, and proper syncing of your files and data.

While this can remove iCloud and all related services from a device, this is not a replacement for resetting an iPhone to factory settings, which completely clears out all data and basically performs a fresh iOS installation. Obviously reseting everything isn’t going to be necessary if you simply need to change the login though, so use which is appropriate for the given situation.

Source : osxdaily[dot]com

Thứ Sáu, 17 tháng 10, 2014

How to Beta Test Your App Using TestFlight

0 Flares 0 Flares ×

Suppose you built an app and completed the testing of your app on a real device. So what’s next? Submit your app directly to App Store and make it available for download? Yes, you can if your app is a simple one. However, if you’re developing a high quality app, don’t rush to get your app out. I suggest you beta test the app before the actual release.

A beta test is a step in the cycle of a software product release. I know you’ve tested your app using the built-in simulator and on your own device. Interestingly, you may not be able to uncover some of the bugs, even though you’re the app creator. By going through beta test, you would be amazed at the number of flaws discovered at this stage. Beta testing is generally opened to a select number of users. They may be your potential app users, your blog followers, your colleagues, friends or even family members. The whole point of beta testing is to let a small group of real people get their hands on your app, test it and provide feedback. You want your beta tester to discover as many bugs as possible in this stage so that you can fix them before rolling out your app to the public.

You may be wondering how can you conduct a beta test for your app, how beta testers run your app before it’s available on App Store and how testers report bugs?

testflight-featured

In iOS 8, Apple released a new tool called TestFlight to streamline the beta testing. You may have heard of TestFlight before. It has been around for several years as an independent mobile platform for mobile app testing. In February 2014, Apple acquired TestFlight’s parent company, Burstly. With the official release of Xcode 6 and iOS 8, TestFlight is now integrated into iTunes Connect that allows you to invite beta testers using just their email addresses.

TestFlight allows you to arrange testing with external testers and internal users. Conceptually, both can be your testers at the beta testing stage. However, TestFlight refers internal users as members of your development team who have been assigned the Technical or Admin role in iTunes Connect. You’re allowed to invite up to 25 internal users to test your app. An external tester, on the other hand, is considered as an user outside your team and company. You can invite up to 1,000 users to beta test your app. There is a catch, though. Your app must be approved by Apple before you can invite your external testers for testing. This restriction doesn’t apply to internal users. Your internal users can begin beta testing once you upload your app to iTunes Connect.

In this tutorial, I will walk you through the beta test process using TestFlight. At the time of this writing, you can only arrange beta test for internal users only. So we will focus on beta testing with internal users. In general, you need to go through the below tasks to distribute an app for beta testing:

  • Create an app record on iTunes Connect.
  • Update the build string.
  • Archive and upload your app.
  • Manage beta testing in iTunes Connect.

Let’s get started.

Creating an App Record on iTunes Connect

Firstly, you need an app record on iTunes Connect before you can beta test an app. iTunes Connect is a web-based application for iOS developers to manage their apps sold on App Store. Assuming you have enrolled in the iOS Developer Program, you should be able to access iTunes Connect at http://itunesconnect.apple.com.

TestFlight - New App Record

Once signed into iTunes Connect, select My Apps and the + icon to create a new iOS app. You’ll be prompted to complete the following information:

  • App name – your app name appears on App Store
  • Primary language – the primary language of your app such as English
  • Bundle ID – the bundle ID of your app
  • Version – the version number of your app. If this is the first release, you can just put in
    1.0.
  • SKU – stands for Stock Keeping Unit. It can be anything you like. For example, your app
    name is “Awesome Food App”. You can use “awesome_food_app” as the SKU. You can use letters, numbers, hyphens, periods and underscores except space.

Once you click the Create button, you’ll proceed to another screen to fill in the details of your app.

App Video and Preview

TestFlight App Info

These are the preview screens for your app. In iOS 8, Apple lets you incorporate an app video in the preview. You need to provide at least one screenshot for 3.5- inch (640×960 pixels for portrait or 960×640 pixels for landscape), 4-inch (640×1136 pixels for portrait or 1136×640 pixels for landscape), 4.7-inch (750×1334 pixels) and 5.5-inch (1242×2208 pixels) devices. You can further refer to Apple’s iTunes Connect Developer guide for details.

App Description and URL

TestFlight - App Info

Next, fill in your app description and at at least one keyword that describes your app. It’s one of the most important elements affecting your app download. You may have heard of App Store Optimization (ASO). Keyword optimization is a part of ASO. I will not go into keyword optimization here. If you want to learn more about keyword optimization, you can refer to this article or just google ASO.

The support URL is mandatory. You can fill in the URL of your website or blog. If you don’t have one, register a website at wordpress.com.

General App Information

The next section is about the general information of your app. You need to upload the app icon. Remember the app icon (1024×1024 pixels) must be not contained any transparency element. Here is a sample of the app icon.

app icon

The icon has a square shape. After you upload the app icon to iTunes Connect, the icon will be converted to appear with rounded corners.

Next, fill in the version number (e.g. 1.0) and pick a category that best describes your app.

You need to give a rating for your app. Just click the Edit button next to Rating and complete the form. iTunes Connect generates a rating for your app based on your answers.

For the copyright field, you can just fill in your name or company preceded by the year the rights were obtained (e.g. 2014 AppCoda Limited).

If you want to list your app on Korean App Store, you need to provide the Trade Representative Contact Information.

App Review Information

You can skip the Build section and go straight to the App Review Information. Simply fill in your contact information.

The demo account field is optional. It is for those apps that require login.

Version Release
You’re allowed to release your app automatically or manually right once it has been approved by App Review. Just set it to Automatically release this version.

Finally click the Save button on the top right corner to save the changes.

If you didn’t miss any information, the “Submit for Review” should be enabled. That means your app record was successfully created on iTunes Connect.

Update Your Build String

Now go back to Xcode. You’re going to build your app and upload to iTunes Connect. But before that, review your project and make sure the version number matches what you entered in iTunes Connect.

In the project navigator, select the project and the target to display the project editor. Under the General tab, review the version field under Identity section. As this is the first build, set the Build field to 1.

testflight-24-7

Archiving and Uploading Your App

Before archiving your app, you should include the app icon and launch image in your Xcode project. The app icons are managed by the asset catalog. You should find the AppIcon set in Images.xcassets. To add an icon to the set, select an app icon in the Finder and drag it to the appropriate image well in the set viewer. You will need to provide various sizes of app icons to fit for different devices.

App Icon in image asset

Assuming you’ve included the app icon and launch screen in your Xcode project. You’re now ready to archive upload your app to iTunes Connect. It’s pretty easy to archive your app in Xcode 6. First, review the Archive scheme settings and ensure the build configuration sets to Release (instead of Debug).

TestFlight Scheme Setting

Go up to the Xcode menu. Choose Product > Scheme > Edit Scheme. Select Archive scheme and review the Build Configuration setting. The option should be set to Release.

Now you’re ready to archive your app. The Archive feature is disabled if you’re using a simulator. So first select iOS Device or your device name (if you have connected your iPhone to your Mac) from the Scheme toolbar menu. Then go up to the Xcode menu and choose Product > Archive.

Archive App

After archiving, your archive will appear in the Organizer. It’s ready to upload to iTunes Connect. But it’s best to go through the validation process to see if there are any issues. Just click the Validate button and then select your developer account. Xcode will then validate your archive.

App Upload - Organizer

If the validation is successful, you can click the Submit button to upload the archive to iTunes Connect.

TestFlight Upload Successful

Manage Beta Testing in iTunes Connect

Now that you’ve uploaded your build to iTunes Connect. Go back to http://itunesconnect.apple.com. Select My Apps and then your app.

You will find your app archive under PreRelease tab. To enable beta testing, flip the TestFlight Beta Testing to ON. The status will be changed from Inactive to Invite Testers.

Enable Testflight

Click Invite Testers and then click “Users and Roles” to invite your internal testers to try out the app. For existing users with Admin, Legal, or Technical role, you will see an Internal Tester switch. Flip it to ON to assign it as a tester.

Testflight Enable Beta Tester

Note: If the tester you want to invite is not in the list, you can click + icon to create an account for the user and set its role to Technical. Once saved, ask the tester to confirm his/her email so as to activate the account.

Then go back to your app. Under the Prerelease tab, select Internal Testers tab and you will see the tester that you just assigned. Click the checkbox of the tester and click Invite
button to send an invitation of the TestFlight Beta Testing. Your tester will receive an email of the invitation.

Testflight - send invitation

The tester just needs to click the Open TestFlight button and iOS automatically opens TestFlight app. The tester can then install your app for beta testing. If your tester does not have the TestFlight app installed, he/she will need to install it first.

Testflight app

For any future update of your beta app, your internal testers will always get the most recent build you uploaded.

Summary

Apple’s acquisition of TestFlight provides us with a powerful tool to easily beta test our apps. In this tutorial, I have walked you through the basics of TestFlight Beta Testing. If you’re building your next app, use the tool to invite your friends to test out your app before the official release. This is an important step to build a high quality app.

What do you think about the tutorial? Leave us comment and share your thought.

This is an excerpt of our Beginning iOS 8 Programming with Swift book. If you like the tutorial, check out our new book and support us.

Source : appcoda[dot]com

Thứ Năm, 16 tháng 10, 2014

iOS 8.1 Release Date Set for October 20

iOS 8.1 iOS 8.1 will be released for compatible iPhone, iPad, and iPod touch devices on Monday, October 20, according to Apple. The update will include new features like Apple Pay, the re-introduction of the Photos app Camera Roll, the ability to interact with Macs running OS X Yosemite, and the update is expected to include many bug fixes and solutions to some of the nuisances that arrived with the initial releases of iOS 8.


Typically Apple releases software updates in the morning, so users should expect to find the download sometime in the earlier half of the 20th. The release date for iOS 8.1 was announced by Apple at the October 16 iPad / Mac Event.

Separately, Mac users can find OS X Yosemite available now as a free download. Mac and iOS users who wish to use the Handoff and Continuity features will need to update their iPhone, iPad, and iPod touch devices to iOS 8.1, and their Macs to OS X Yosemite.

As usual, we’ll provide download links to the iOS 8.1 IPSW when they become available. Most users will be better off downloading the update through the Software Update mechanism on their devices, however.

All iPhone, iPad, and iPod touch models bought after Monday from Apple will pre-ship with iOS 8.1 installed.

All iDevice users who are currently running iOS 8 or iOS 8.0.2 are going to be strongly recommended to update to the iOS 8.1 release when possible, as it will not only include the new features, but it will presumably resolve most of the complaints and issues that have annoyed a select number of users.

As always, back up an the iPhone, iPad, or iPod touch to either iTunes or iCloud, or both, before installing software updates.

Source : osxdaily[dot]com

Thứ Năm, 4 tháng 9, 2014

Understanding Self Sizing Cells and Dynamic Type in iOS 8

4 Flares 4 Flares ×

In iOS 8, Apple introduces a new feature for UITableView known as Self Sizing Cells. To me, this is seriously one of the most exciting features for the new SDK. Prior to iOS 8, if you want to display dynamic content in table view with variable height, you would need to calculate the row height manually. Now with iOS 8, Self Sizing Cell provides a solution for displaying dynamic content. In brief, here are what you need to do when using self sizing cells:

  • Define auto layout constraints for your prototype cell
  • Specify the estimatedRowHeight of your table view
  • Set the rowHeight of your table view to UITableViewAutomaticDimension

If we express the last two points in code, it looks like this:

1
2
tableView.estimatedRowHeight = 44.0
tableView.rowHeight = UITableViewAutomaticDimension

With just two lines of code, you instruct the table view to calculate the cell’s size matching its content and render it dynamically. This self sizing cell feature should save you tons of code and time. You’re gonna love it.

self-sizing-cell-featured

Building a Simple Demo Using Self Sizing Cell

There is no better way to learn a new feature than using it. We’ll develop a simple demo app to demonstrate self sizing cell. We’ll start with a project template. It’s just a simple table-based app showing a list of hotels. The prototype cell contains two one-line text labels for both name and address. If you download the project and run it, you’ll have an app like below:

Table View App with Truncated Text

As you can see, due to fixed row height, some of the hotel addresses are truncated. You may have faced the same issue when developing table-based apps. In the past, you may simply reduce the font size or increase the number of lines to fix the issue. Starting from iOS 8, all you need to do is to use Self Sizing Cells and the cell content can be displayed properly, regardless of content length.

Adding Auto Layout Constraints

You may hate Auto Layout and avoid using it. However, without auto layout, self sizing cells won’t work as it relies on the constraints to determine the proper row height. In fact, table view calls systemLayoutSizeFittingSize on your cell and that returns the size of the cell based on the layout constraints.

If this is the first time you work with Auto Layout, I recommend you to check out our Auto Layout Introduction before moving on.

For the project template, I haven’t defined any auto layout constraints for the prototype cell. So let’s add a few constraints for the cell first. For the name label, click the Pin button of the auto layout menu and add four spacing constraints.

Auto Layout Prototype Cell

For the address label, add further three spacing constraints for the left/right/bottom side.

Auto Layout Prototype Cell

If you have configured the constraints correctly, they should look something like below:

Self Sizing Cell - Auto Layout

Self Sizing Cell - Auto Layout

Setting Estimated Row Height

With the auto layout configured, the rest is to add the following code in the viewDidLoad method of the ViewController:

1
2
tableView.estimatedRowHeight = 68.0
tableView.rowHeight = UITableViewAutomaticDimension

The first line of code sets the estimated row height of the cell, which is the height of the existing prototype cell. The second line changes the rowHeight property to UITableViewAutomaticDimension, which is the default row height in iOS 8. In other words, you tell table view to figure out the cell size based on other information.

If you test the app, the cell is still not resized. The reason is that both name and address labels are set to 1-line. So set the number of lines to zero and let the label grow automatically.

Self Sizing Cell - Number of Line

Now compile and run the app again. The table view cells are resized according to the content.

Self Sizing Cell Demo

A Bug?!

I’m not sure if it is a bug or not. But the problem was also mentioned by UseYourLoaf. When the table view is first displayed, you may find some of the cells are not sized properly. But when you scroll the table view, the new cells are displayed with correct row height. To workaround this issue, you can force a reload after the view appears:

1
2
3
4
5
    override func viewDidAppear (animated : Bool ) {
   
        tableView.reloadData ( )
   
    }

Dynamic Type

Self Sizing Cell is particularly useful to support Dynamic Type. You may not have heard of Dynamic Type but you probably see the following screen in Settings:

Dynamic Type Settings

Dynamic Type was introduced in iOS 7. It allows users to customise the text size to fit their own needs. However, only apps that adopt Dynamic Type respond to the text change. I believe only a fraction of third-party apps have adopted the feature.

Starting from iOS 8, Apple wants to encourage developers to adopt Dynamic Type. As mentioned in the WWDC session, all of the system applications have adopted Dynamic Type and the built-in labels have dynamic fonts on them automatically in iOS 8. As the user changes the text size, those labels are going to change size.

Further, the introduction of Self Sizing Cell is a way to facilitate Dynamic Type adoption. It saves you tons of code from developing your own solution to adjust the row height. Once the cell is self-sized, it is very straightforward to adopt Dynamic Type.

In the demo project, you just need to change the font from a custom font of fixed size to a preferred font for text style (e.g. headline, body, etc). That’s it. When you run the app, it adapts to the text size change.

Dynamic Type Demo

Summary

In this tutorial, I have walked you through the basics of Self Sizing Cells and Dynamic Type. You’re encouraged to use the feature and update your app to adopt Dynamic Type. Self Sizing Cell is seriously one of my favorite features in iOS 8. With just a couple lines of code, you can easily fit dynamic content in a cell. This is truly fabulous. What do you think? Leave me comment and share your thought.

For your reference, you can download the complete project from here. Please note that I used Xcode 6 Beta 7 to create the project.

If you enjoy this tutorial, you’ll probably like our new book. We’re going to launch a new book called Beginning iOS 8 programming with Swift. It’s a beginner guide for anyone who want to learn Swift, Xcode 6 and master the new APIs of iOS 8 SDK. The book will launch in October. To receive an early access of the book, please sign up here.
Source : appcoda[dot]com

Create a New iTunes Radio Station from Currently Playing Song or Artist

iTunes Radio Music Have a favorite song that you want to use to seed a new music station? Maybe you’re looking to find some new tunes to hear based on a particular song or artist? iTunes Radio makes this process simple, and you can instantly create a new iTunes Radio station from any playing song or artist, whether that song is in your music library or playing from an existing iTunes Radio station. The latter situation is fairly well known by Radio users, but creating a new station from songs that already exist in an iTunes playlist is less well known. This works with any iTunes client that supports the Radio feature, whether it’s the desktop iTunes app or the Music app in iOS.


iTunes Radio is currently region limited, but for users who are outside of the USA and other areas with Radio support, you can still listen to iTunes Radio with a US-based Apple ID.

How to Make a New iTunes Radio Station from a Playing Song in iTunes

Creating a new radio station this way is the same in Mac OS X and Windows:

  1. From the iTunes app, access your music playlist or library as usual
  2. Hover over a song then click the (>) arrow button over the song name
  3. Select “New station from Artist” or “New station from Song” to create a new iTunes Radio channel

Create a new iTunes Radio station from a song or artist

You can also access the New Station features from the iTunes Album Art player, as shown above, or with a Right-Click on any song name in the iTunes song playlist.

Making a new radio station this way will immediately jump to the Radio portion of iTunes (or Music app), from there you can either tweak it to play towards discovering new music or just playing the hits, to allow or deny explicit lyrics and thus album versions of some songs, and the other usual adjustments.
Playing a newly created iTunes Radio station

On the iOS side of things, you can access the same feature within the Music app on the iPhone, iPad, or iPod touch, by tapping on the (i) button as if you were to share a station but choose “New station from song” or “New station from artist” instead.

Enjoy your newly created iTunes station. This can be a really great way to find new music, particularly if you tweak the settings for “Discovery”, or if you just want to play some of the related genre classics, keep it on ‘Hits’, which is the default setting.

Source : osxdaily[dot]com

Thứ Ba, 2 tháng 9, 2014

How to Remove Red Eye from Photos on iPhone & iPad

Fix Red Eye on iPhone with Photos app

Red Eye happens sometimes in photography, often if you’re shooting a subject while using the camera flash, or when a bright light is shining in their eyes. The appearance is striking and usually undesirable, with the subjects eyes literally glowing red. You may run into the red eye effect when taking pictures with any camera, but the iPhone, iPod touch, and iPad all have a fantastic trick up their sleeve that lets you quickly remove red eye from just about any picture.


To use the native red eye removal tool, you’ll need to be running modern version of iOS versioned anywhere at or above 7.0, other than a newish versions of iOS, no additional downloads or apps are needed. The feature is part of the editing tools in the Photos app, and though you can certainly use it to remove red eye from any picture taken with the iPhone camera, you can also use the same tool on any picture provided to the iOS device too.

How to Remove Red Eye Effect from Pictures with iPhone, iPad, & iPod touch

  1. Go to the Photos app and tap on the picture that has the red eye effect you wish to fix
  2. Tap on the photo and then tap on the “Edit” button
  3. Tap the little eye icon with a slash through it (this is the red eye removal tool button)
  4. Remove Red Eye from photos with iPhone

  5. Tap directly onto the red eyes in the photo you want to fix and remove, choose one at a time
  6. When finished correcting all red-eye and satisfied with the result, tap on “Apply” to save the change
  7. Fixing red eye photos on the iPhone

The results of the iOS Photos app native Red Eye Removal Tool are immediate and extremely effective, as shown in this example:

Red eye removal on iPhone before and after picture

If you want to try out the red eye removal tool yourself but don’t have a picture handy, you can use the same red eye sample image we are in the tutorial courtesy of Wikipedia here. The feature works the same on any iPhone, iPad, or iPod touch.

Note that you can undo the red eye removal at any time as long as the originally edited picture is stored on the iOS device, this is much like applying filters that can also be later removed if desired.

This is really an excellent solution that Apple created, and it doesn’t require any funky tricks, photoshop usage, or third party apps. It’s also preferable to turning the picture into black and white, which is sort of an old fashioned way of handling red eyed images, and with how easy and effect the iOS native red eye tool works, you should aim to use it first.

Source : osxdaily[dot]com

Thứ Hai, 1 tháng 9, 2014

Change the Number of Apps in the iOS Dock to Get Minimal

Customize the iOS Dock and change it

The iOS Dock sits at the bottom of our iPhone, ipod touch, and iPad home screen, intended to hold the most commonly used apps for quicker launching. While it’s well known that you can customize the apps that are contained within the Dock, what’s lesser known is that you can actually reduce the number of apps visible from the 4 default, down to 3, 2, 1, and, if you really want to, 0 apps.

Reducing the app count in the iOS Dock is done by simply by pulling the apps out of the Dock. First, tap and hold on any app icon to make the home screen icons jiggle, then once when they’re wiggling around, drag the app(s) from the Dock back onto the home screen that you want to remove from the Dock.

Here’s what the iPhone Dock look like with just a single app visible, the Phone app:

Minimalist iPhone dock

Reducing the Dock app count to a single or couple of apps may be practical for some situations, but it’s hard to imagine a reason to do clear everything from the Dock… nonetheless I actually had a friend ask to do just that… so, if for whatever reason you’re not a fan of having apps in the Dock or maybe you just want a clean slate, you can yank everything out out and start with an empty Dock.

Removing everything from the iOS Dock is done the same way you’d move icons around in iOS in general: Again, simply tap and hold on a Dock icon to start it jiggling, then move each app icon from the Dock and onto the Home Screen. Repeat until it’s totally empty, and you’re left with an empty Dock. This is what this looks like with a home screen still full of icons:

Empty iPhone Dock

Having nothing in the Dock is really a waste of valuable screen space, because unlike in OS X, it’s not like the iOS Dock hides itself when it’s not in use. Instead, it’ll just take up a considerable portion of your home screen without serving a purpose, making this a rather pointless exercise, but yes, it can be done if you want it done for some reason or another.

If you’re aiming for minimalism, a much more practical endeavor may be to create a completely blank home screen instead, which emphasizes the wallpaper. This is my personal preference, and I use it to keep a home screen that is free of any icons until you flip over to see them. For users like me who mostly use the apps in their Dock icons, this can work without interfering in productivity:

blank iPhone home screen to emphasize the wallpaper

Combine the above trick with reducing the total number of icons in the Dock to a lower number and you may be able to find a happy medium too, particularly if you feel like the default amount of 4 for the iPhone and 6 for the iPad is too busy. But going with absolutely nothing in the Dock or the initial home screen? Well, that’s possible, but as you can see, it looks quite funny, you are left with literally a iOS blank screen of nothing:

blank dock blank home screen on iPhone

Perhaps it would look better with a custom wallpaper, but again, it’s hard to imagine a scenario where it would be practical. Regardless, it’s nice to know that iOS has that level of customization, able to suit whatever your dock needs are. Don’t forget that you can also change the Dock appearance by adjusting the transparency settings or changing the wallpaper used too.

Source : osxdaily[dot]com