In iOS 8, Apple introduced app extensions which let you extend functionality beyond your app and make it available to users from other parts of the system like in other apps or from the Notification Center. iOS defines different types of extensions, each tied to an area of the system such as the keyboard, Notification Center, e.t.c. A system area that supports extensions is called an extension point. Below is a list of the extension points in iOS.
- Today – Shows brief information and can allow performing of quick tasks in the Today view of Notification Center
- Share – Share content with others or post to a sharing website
- Action – Manipulate content in a host app
- Photo Editing – Edit photos or videos within the Photos app
- Document Provider – Provide access to and manage a repository of files
- Custom Keyboard – Provide a custom keyboard to replace the iOS system keyboard

We will cover all these extension points in this and subsequent tutorials. With this article, we will focus on the Today Extension.
How Extensions Work
Before getting started with the Today Extensions, first let’s take a look at how extensions work as some of the concepts covered here will be used later in the tutorial.
To start off, extensions cannot be stand alone apps. They are delivered via the App Store as part of the app bundle. The app that the extension is bundled with is known as the container app while the app that invokes the extension is the host app. You can have more than one extension in a container app.
When an extension is running, it doesn’t run in the same process as the container app. Every instance of your extension runs as its own process. It is also possible to have one extension run in multiple processes at the same time. For instance, if let’s say, you have a sharing extension which is invoked in Safari. An instance of the extension, a new process, is going to be created to serve Safari. Now, if the user goes over to Mail and launches your share extension, a new process of the extension is created again. These two processes aren’t going to share address spaces.
An extension cannot communicate directly with its container app, nor can it enable communication between the host app and container app. However, indirect communication with its container app is possible via openURL() or via a shared data container like the use of NSUserDefaults to store data which both extension and container app can read and write to.
The Today Extension
Today extensions, also known as widgets, appear on the Today View of the Notification Center. They provide brief pieces of information to the user and they even allow some interaction, though limited, right from the Notification Center. You’ve seen these available in previous versions of iOS, for e.g. Reminders, Stocks and Weather. In iOS 8, third party apps can now have their own widgets.
We are going to see how to create a widget. So that we can focus on this and not on creating an app from scratch, I have provided a starter project that you can download here. The project is of a simple weather app which shows various weather information of a particular location. You will need an internet connection for the data to be fetched. To keep it simple, I didn’t include any GeoLocation functionality, and so user’s location is assumed to be Cupertino, CA. (You can easily modify the app to get weather data of your current location by using core location and placing the latitude and longitude values in the API url. A good tutorial on how to do this can be found here ).
The project comes with an API key that you can use, but should it stop working, you can register at forecast.io to get your own API key. Then replace the key in the url in the WeatherService.swift file
On running the app, you should see a view with weather details as shown below.

We are going to create a Today extension of the app that will show a brief summary of the weather in a view that can be expanded to reveal more data. We’ll also see how we can share data between the container app and extension. We’ll use this shared data to enable the user to set the location they want weather information on.
Embedded Frameworks and Code Reuse
Extensions are created in their own targets separate from the container app. This means that you can’t access common code files as you normally would in your project. To allow for code reuse between the container app and extension, you create an embedded framework which can be used across both targets. Place code that will need to be used by both the container app and extension in the framework to avoid code repetition.
In our app, both the extension and container app make a call to an API and update properties with the data from the API. Without using a framework, we would have to maintain two code bases with similar code, which would be inefficient and prone to errors.
To create a framework, select your project in The Project Navigator and add a new target by selecting Editor > Add Target.
Select iOS > Framework & Library > Cocoa Touch Framework from the window that appears. Set its name as WeatherDataKit and check that the language is Swift (we use Swift here, but you can select whichever language you prefer). Leave the rest of the options as they are and click Finish.

You will see a new target in the list of targets and a new group folder in the Project Navigator. When you expand the WeatherDataKit group, you will see WeatherDataKit.h. If you are using objective C or if you have any objective C files in your framework, then you will include all public headers of your framework here. We don’t have objective C code in our framework, so we won’t be editing this file.
You should note that app extensions are somewhat limited in what they can do and therefore not all Cocoa Touch APIs are available for use in extensions. For instance extensions cannot do the following:
- Access the camera or microphone on an iOS device
- Receive data using AirDrop (It can however send data using AirDrop)
- Perform long-running background tasks
- Use any API marked in header files with the NS_EXTENSION_UNAVAILABLE macro, or similar unavailability macro, or any API in an unavailable framework for example EventKit and HealthKit are unavailable to app extensions.
- Access a sharedApplication object, and so cannot use any of the methods on that object
You can have the compiler let you know when you use disallowed APIs by selecting your framework from the list of targets. On the General tab, on the Deployment Info section, check Allow app extension API only.

In the starter project, I had abstracted out common code into the files that are under the WeatherData folder group. Drag this folder into the WeatherDataKit group.

Merely dragging a file from one target to another doesn’t make the file part of that target though. You have to change the file’s target membership yourself. To do this, select the WeatherDataViewController.swift file from the Project Navigator. Then open the File Inspector and change the files target in the Target Membership section by unchecking the Weather target and checking the WeatherDataKit target. Do the same for the WeatherService.Swift and WeatherData.swift files.
After doing this, there will be some error messages in ViewController.swift. Include the following import statement at the top of the file.
| 1 | import WeatherDataKit |
Build the app and it should work as before.
Creating the Widget
To create a widget, we’ll use the Today extension point template that Xcode provides. Select the project in the Project Navigator and add a new target by selecting Editor > Add Target. Select iOS > Application Extension > Today Extension and then click Next.

Set the Product Name to Weather Widget and leave the rest of the settings as they are. Click Finish.

You will get a prompt asking if you want to activate the Weather Widget scheme. Press Activate. Another Xcode scheme has been created for you and you can switch schemes by navigating to Product > Scheme and then selecting the scheme you want to switch to. You can also switch schemes from the Xcode toolbar.
From the list of available targets, select Weather Widget then on the General tab press the + button under Linked Frameworks and Libraries. Select WeatherDataKit.framework and press Add.

With the framework linked, we can now implement the extension.
In the Project Navigator you will see that a new group with the widget’s name was created. This contains the extensions storyboard, view controller and property list file. The plist file contains information about the widget and most often you won’t need to edit this file, but an important key that you should be aware of is the NSExtension dictionary. This contains the NSExtensionMainStoryboard key with a value of the widget’s storyboard name, in our case “MainInterface”. If you don’t want to use the storyboard file provided by the template, you will have to change this value with the name of your storyboard file.
Open MainInterface.storyboard. You’ll see a simple view with a Hello World label. To run the extension, make sure the Weather Widget scheme is selected in Xcode’s toolbar and hit Run. A window will pop up for you to chose an app to run. This lets Xcode know which host app to run. Chose Today. With this selection, iOS will know to open Notification Center in the Today view, which in turn launches your widget. Notification Center is the Today Extension’s host app. Click Run and you should see the widget on your simulator’s/device’s Notification Center.

To display the weather data in our image, we first import the WeatherDataKit framework into our view controller. Add the following to the TodayViewController.swift file.
| 1 | import WeatherDataKit |
Then make the class a subclass of WeatherDataViewController by changing its declaration to the following.
| 1 | class TodayViewController: WeatherDataViewController, NCWidgetProviding |
Delete the Hello World label. Set the view’s height to 270 (Leave the width at 320).
Drag two labels and a button into the main view. Set the text of the labels as “Cupertino, CA” and “100” respectively and their color to Red: 66, Green: 145 and Blue: 211 (usually, you should select bright colors for your widget controls so that they are visible in the Notification Center’s dark blurry background). Delete the button’s title and set its image to ‘caret’. The caret.png file was included in the starter project. When you run the app, the image will not appear on the button. This is because the asset catalog has only been added to the container app’s target. To add it to the extension’s target, select Images.xcassets and in File Inspector, check Weather Widget. Leave the Weather target checked.

Drag a view into the main view and stretch it out so that its left and right and bottom sides hug the main view. Place the views roughly as shown below. You don’t need to be accurate, we will use Auto Layout for this. For visibility, I have left the view’s background color as white, but we will set it to clear color so that the whole widget blends with the Notification Center background.

Select the view you just added, open the Identity Inspector and enter MoreDetailsContainer in the Label field of the Documents pane(you might need to expand the Documents pane to reveal the Label field). This gives the view a name and makes it easier to identify in the Document Inspector. Also set the views background color to clear color in the Attributes Inspector. You should have the following.

The Apple Extensions Guide recommends widgets to be small and to have an adjustable height that allows users to show or hide information as appropriate. If your widget only shows brief information, this won’t be necessary but if it shows a lot of data, it is better to only make the most important information visible and allow the user the ability to expand the view to show more data. This is what we will do with our widget. The widget will only display the location and current temperature and on tapping the button with the caret image, the view will expand to reveal more weather data. We will set this data’s location and constraints relative to the MoreDetailsContainer view so that hiding and displaying this data will just be a matter of adjusting the MoreDetailsContainer view’s constraints.
Add the labels for the other data and place them on the MoreDetailsContainer view. Give them titles as shown below. You can set your own title, but note that I will be referring to them by their title if I need to e.g. summary label, Mostly Cloudy label, 100 label, e.t.c. I set the color of these labels to Light Text Color.

Select the Cupertino, CA label and then select Editor > Size to Fit Content. Do the same for the other labels that will be populated by the API call i.e. the 100, Mostly Cloudy, 0.65, 0.10 and 02:00 PM labels.
We’ll now add Auto Layout constraints to the view. Select the MoreDetailsContainer and then select Pin from the Auto Layout controls at the bottom of the Interface Builder canvas. Pin its Leading, Trailing and Bottom space to 0 and its Height to 220. Uncheck Constrain to margin checkbox. With this unchecked, there will be no padding around your view.

Select the Cupertino, CA label and pin its Top and Leading space to 13 and 20 respectively. Make sure Constrain to margin is unchecked (for the rest of the article, have it unchecked for all the constraints we add)

Select the caret button and pin its Top, Trailing and Bottom spaces to 10, 20, 10. Set its Width and Height to 30 and make sure both these checkboxes are selected.

Select the 100 label and pin its Top and Trailing spaces to 13 and 20 respectively.

Control-Drag from the Mostly Cloudy label to the Summary label and select Center Y. This will align the two labels centers. Do this for the other pairs of labels i.e. 0.65 and Humidity, 0.10 and Precipitation, e.t.c.
Select the Summary label and pin its Leading and Top spaces to 20 each. Also check its Width checkbox and set the value to 130.
Control drag from the Mostly Cloudy label to the Summary label and select Horizontal Spacing. Then select this constraint either from the view controller or from the document outline. In the Size Inspector, change the constraint’s Constant to 20.

You can also select the constraint by selecting the Mostly Cloudy label, and then in Size Inspector in the Constraints pane, find the Leading Space to SUMMARY constraint and edit its Constant to 20.

Control-Drag from the Humidity label to the Summary label and select Left. This will align its Leading position to the Summary label’s Leading position. Select that constraint and in the Size Inspector, make sure that its Constant is set to 0. Sometimes when you align the views Leading positions, a constant is set which will make them not properly aligned. Do the same for the Precipitation and Last Updated labels – Control-Dragging to the Summary label and selecting Left, then making sure the constraints Constant is 0.
Next select the Humidity label and Pin its Top space to 20. This sets its distance from the Summary label. Do the same for the Precipitation and Last Updated labels. Setting their distance from the conrol on top of them to 20 points.
Next Control-Drag from the 0.65 label to Mostly Cloudy label and select Left. Do the same for the 0.10 and 02:00 PM labels. This will align the labels starting point. Then select the main view and select Editor > Resolve Auto Layout Issues, under All Views, select Update Frames. Interface Builder will now show the constraints in their set positions.
Before setting up the labels to show real data from the API, run the app to make sure that everything is set correctly. You should see the following.

You’ll notice that the widget has a large left margin. If you want to fill the entire width of Notification Center, implement the following method. Place the following code in the TodayViewController class.
| 1 2 3 4 | func widgetMarginInsetsForProposedMarginInsets (defaultMarginInsets: UIEdgeInsets) -> (UIEdgeInsets) { return UIEdgeInsetsZero } |
Run the project again and your widget will now fill the width of the Notification Center.

To implement the view’s Show More button, open the Assistant Header to reveal the TodayViewController.swift file next to the storyboard. Control Drag from the button to the view controller file and add an Outlet. Name it showMoreButton. Then Control-Drag again from the button and change the Connection to Action. Set the Type to UIButton and Name to showMore. You should have the following code added to the class.
| 1 2 3 4 | @IBOutlet weak var showMoreButton: UIButton! @IBAction func showMore(sender: UIButton) { } |
We then need to create an outlet for the MoreDetailsContainer view’s height constraint. We’ll be changing its value to expand and shrink the view. In Document Outline, expand the MoreDetailsContainer and expand its constraints. Find the height constraint. It should be labelled Height – (220) – MoreDetailsContainer. Control-Drag from it to the view controller and create an Outlet. Name it ‘moreDetailsContainerHeightConstraint’. You should have the following.
| 1 | @IBOutlet weak var moreDetailsContainerHeightConstraint: NSLayoutConstraint! |
Add the following property which will keep track of whether the view is expanded.
| 1 | var widgetExpanded = false |
In viewDidLoad() add the following
| 1 | moreDetailsContainerHeightConstraint.constant = 0 |
This sets that view’s height constraints’ constant to 0, so that it’s hidden by default.
Modify the showMore() action method as follows.
| 1 2 3 4 5 6 7 8 9 10 11 | @IBAction func showMore(sender: UIButton) { if widgetExpanded { moreDetailsContainerHeightConstraint.constant = 0 showMoreButton.transform = CGAffineTransformMakeRotation(0) widgetExpanded = false } else { moreDetailsContainerHeightConstraint.constant = 220 showMoreButton.transform = CGAffineTransformMakeRotation(CGFloat(180.0 * M_PI/180.0)) widgetExpanded = true } } |
This checks to see if the view has been expanded, and sets the constraint back to 0, otherwise it sets it to 220, which is the height we had specified for the view. We also add an animation where the button caret faces down when the view is collapsed and points up when the view has been expanded.
With the interface set up, we should now connect the extension’s controls with the superview’s outlets. Open the extension’s storyboard file. In the Documents Outline, Control-Drag from the Today View Controller to the Cupertino, CA label and select locationLabel. Do the same for the 100 label and select temperatureLabel. Repeat for Mostly Cloudy(summaryLabel), 0.65(humidityLabel), 0.10(precipitationLabel) and 02:00 PM(timeLabel).
In TodayViewController.swift add the following property to the class.
| 1 | var latLong = "37.331793,-122.029584" |
Add the following at the end of viewDidLoad()
| 1 2 3 4 5 | temperatureLabel.text = "--" summaryLabel.text = "--" timeLabel.text = "--" humidityLabel.text = "--" precipitationLabel.text = "--" |
Then add the following method to the class. This makes the call to the API and updates the view.
| 1 2 3 4 5 6 7 8 9 | override func viewDidAppear(animated: Bool) { super.viewDidAppear(animated) getWeatherData(latLong, completion: { (error) -> () in if error == nil { self.updateData() } }) } |
Run the app and the widget should populate with real data.

To enable the widget to update its view when it’s off-screen make the following changes to the `widgetPerformUpdateWithCompletionHandler`. The system takes a snapshot of the widget and periodically, will try to update it. If it updates successfully, the function calls the system-provided completion block with the NCUpdateResult.NewData enumeration. If the update wasn’t successful, then the existing snapshot is used.
| 1 2 3 4 5 6 7 8 9 10 | func widgetPerformUpdateWithCompletionHandler(completionHandler: ((NCUpdateResult) -> Void)!) { getWeatherData(latLong, completion: { (error) -> () in if error == nil { self.updateData() completionHandler(.NewData) } else { completionHandler(.NoData) } }) } |
Sharing NSUserDefaults between your app and a Today Extension
As stated earlier, a widget cannot directly communicate with a host app. Having them communicate may however be necessary for your project specification especially if you allow a user to configure some settings on the container app that will affect the extension. You can share data between extension and container app through NSUserDefaults.
We will see how to do this by enabling the user to select a location to view its weather information. The starter project contains a table view controller with a set number of locations the user can choose from. The location variety is hardcoded – this isn’t the best way to store data, but for this demo, it will do.
To get started, change your scheme with Product > Scheme > Weather. In the storyboard file, select the Main View of the View Controller Scene and select Editor > Embed In > Navigation Controller. This will place a navigation bar at the top of the view. Drag a Bar Button Item from the object library and place it on the right side of the navigation bar. Set its title to Edit. Control-Drag from this Bar Button Item to the table view controller and select the ‘show’ segue. Run the application and on tapping on the Edit button, you will see a table view with a list of locations. The My Location cell is selected by default. Selecting any other cell will move the check mark to it. We will save this data to NSUserDefaults so that the widget shows data of the selected location

To enable reading from the same set of NSUserDefaults, select your main app target and choose the Capabilities tab. Switch on App Groups (you will require a developer account for this).
Create a new container and give it a unique name. According to the help, it must start with “group.”. I set the name to ‘group.com.appcoda.weather’.
Select the Weather Widget target and repeat the above process of switching on App Groups. Don’t create a new container for it though. Use the one you had created for the Weather target.
Open LocationTableViewController.swift and add the following property to the class.
| 1 | var defaults: NSUserDefaults = NSUserDefaults(suiteName: "group.com.appcoda.weather") |
This will be used to read and write to NSUserDefaults. You must use the name of your group you created earlier as the suite name.
Modify the refresh() function as follows. Here we check to see if the user has set another location other than My Location as the location to track weather data. If they had done so, we set the value of selectedLocation to this new location.
| 1 2 3 4 5 6 7 8 9 10 11 12 13 14 | func refresh() { // hasSetLocation is set in NSUserDefaults to track whether the user has set any other location apart from My Location var hasSetOtherLocation: Bool? = defaults.boolForKey("hasSetLocation") if let hasSetLoc = hasSetOtherLocation { if (hasSetLoc == true) { selectedLocation = Location.fromRaw(defaults.integerForKey("location"))! } } for i in 0..<Location.NumLocationTypes.toRaw() { var cell:UITableViewCell = tableView(self.tableView, cellForRowAtIndexPath: NSIndexPath(forRow: i, inSection: 0)) cell.accessoryType = selectedLocation.toRaw() == i ? UITableViewCellAccessoryType.Checkmark : UITableViewCellAccessoryType.None } } |
Modify the tableView(tableView: didSelectRowAtIndexPath:) function as shown. We check for the selected location and if it isn’t My Location, then we save the location data to NSUserDefaults. These will be accessed by the container app and widget.
| 1 2 3 4 5 6 7 8 9 10 11 12 13 14 15 16 17 18 19 20 | override func tableView(tableView: UITableView, didSelectRowAtIndexPath indexPath: NSIndexPath) { tableView.deselectRowAtIndexPath(indexPath, animated: true) selectedLocation = Location.fromRaw(indexPath.row)! // If other location is selected then set values that will be used in the API call and to populate the view, otherwise the default Cupertino values will be used if (selectedLocation != .MyLocation) { defaults.setInteger(indexPath.row, forKey: "location") defaults.setBool(true, forKey: "hasSetLocation") let locationData: (String, String) = getLocationData(selectedLocation) let locationDictionary = ["name": locationData.0, "latLong": locationData.1] defaults.setObject(locationDictionary, forKey: "locationData") } else { defaults.setBool(false, forKey: "hasSetLocation") } self.refresh() } |
Below is the function that gets information on the selected location. As I mentioned before, I hardcoded the data for the demo. The function returns a Tuple that holds the location’s coordinates and name.
| 1 2 3 4 5 6 7 8 9 10 11 12 13 14 | func getLocationData(location: Location) -> (String, String) { switch location { case .MicrosoftHQ: return ("Redmond, WA", "51.461231,-0.9259415") case .FacebookHQ: return ("Menlo Park, CA", "37.484765,-122.148549") case .GoogleHQ: return ("Mountain View, CA", "37.422,-122.084058") default: // This will never be reached, but switch blocks have to be exhaustive return ("", "") } } |
In ViewController.swift, add the following property to the class.
| 1 | var defaults: NSUserDefaults = NSUserDefaults(suiteName: "group.com.appcoda.weather") |
Add the following function to the file. This will be called before the call to the API, to check if a different location than My Location was selected and set the latLong property with the coordinates of that location. It also updates the text for the locationLabel with the name of the location.
| 1 2 3 4 5 6 7 8 9 10 11 12 13 | func checkForSetLocation() { // hasSetLocation is set in NSUserDefaults to track whether the user has set any other location apart from My Location var hasSetOtherLocation: Bool? = defaults.boolForKey("hasSetLocation") if let hasSetLoc = hasSetOtherLocation { if (hasSetLoc == true) { let locationDict: NSDictionary? = defaults.objectForKey("locationData") as? NSDictionary if let dictionary = locationDict { locationLabel.text = dictionary["name"] as? String latLong = dictionary["latLong"] as String } } } } |
Call this method before the call to the API.
| 1 2 3 4 5 6 7 8 9 10 | override func viewDidAppear(animated: Bool) { super.viewDidAppear(animated) checkForSetLocation() getWeatherData(latLong, completion: { (error) -> () in if error == nil { self.updateData() } }) } |
In TodayViewController add the following property to the class.
| 1 | var defaults: NSUserDefaults = NSUserDefaults(suiteName: "group.com.appcoda.weather") |
Add the following function to the class. Notice that we are using similar code in the container app’s view controller and the widget’s view controller. If you find yourself repeating code in several places, then it might be best to place the code in a framework.
| 1 2 3 4 5 6 7 8 9 10 11 12 13 | func checkForSetLocation() { // hasSetLocation is set in NSUserDefaults to track whether the user has set any other location apart from My Location var hasSetOtherLocation: Bool? = defaults.boolForKey("hasSetLocation") if let hasSetLoc = hasSetOtherLocation { if (hasSetLoc == true) { let locationDict: NSDictionary? = defaults.objectForKey("locationData") as? NSDictionary if let dictionary = locationDict { locationLabel.text = dictionary["name"] as? String latLong = dictionary["latLong"] as String } } } } |
Call the method before the API call in viewDidAppear()
| 1 2 3 4 5 6 7 8 9 10 11 | override func viewDidAppear(animated: Bool) { super.viewDidAppear(animated) checkForSetLocation() getWeatherData(latLong, completion: { (error) -> () in if error == nil { self.updateData() } }) } |
Do the same in widgetPerformUpdateWithCompletionHandler()
| 1 2 3 4 5 6 7 8 9 10 11 12 | func widgetPerformUpdateWithCompletionHandler(completionHandler: ((NCUpdateResult) -> Void)!) { checkForSetLocation() getWeatherData(latLong, completion: { (error) -> () in if error == nil { self.updateData() completionHandler(.NewData) } else { completionHandler(.NoData) } }) } |
Run the app, change locations and test that the widget does indeed update according to the set data.
What’s Coming Next
In this article we have looked at how to create and configure the Today Extension in your app. In the coming weeks we will look at the other 5 extensions available for iOS, so stay tuned.
For your reference, you can download the complete Xcode project from here.


 For those of us who juggle between multiple iCloud accounts (which is really not recommended), you may need to remove an iCloud account associated with an iPhone or iPad some times. This is typically for situations where you need to swap in a different account, create a new iCloud login for some reason, or just change to another existent iCloud account that is better suited for a device. While iOS makes this process easy, but be sure you know why you would want to do this, otherwise you may encounter unanticipated problems.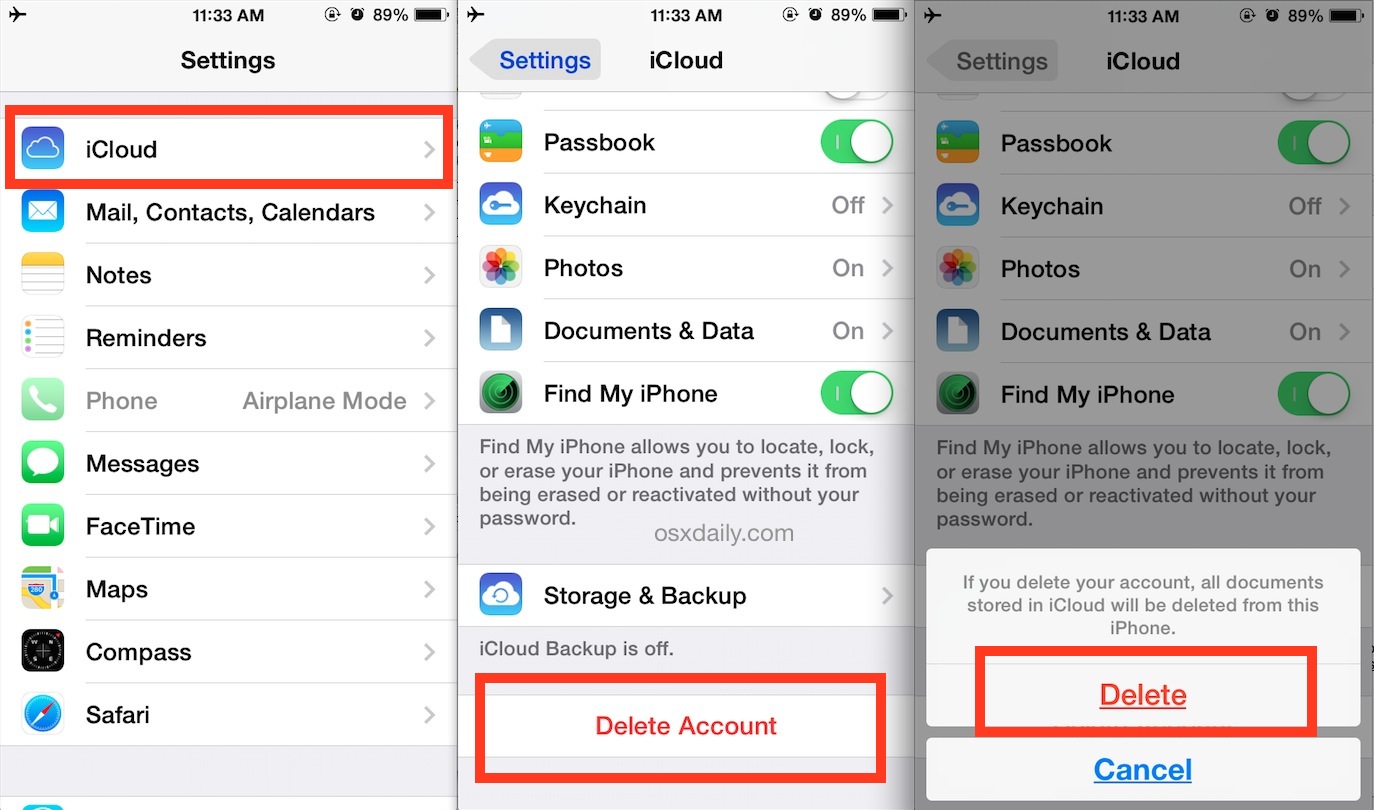


 iOS 8.1 will be released for compatible iPhone, iPad, and iPod touch devices on Monday, October 20, according to Apple. The update will include new features like Apple Pay, the re-introduction of the Photos app Camera Roll, the ability to interact with Macs running OS X Yosemite, and the update is expected to include many bug fixes and solutions to some of the nuisances that arrived with the initial releases of iOS 8.